How to Customise and Print Barcode Labels in myBillBook
Written By Team Flobiz
Last updated About 2 months ago
myBillBook allows you to print barcode labels for one or multiple items, choose from different label sizes, customise the information shown on each label, and set the number of labels you want to print.
Open the Barcode Printing Screen
You can open the barcode printing screen from the Items section in multiple ways.
From the Items List
Go to Items.
Select one or more items using the checkboxes.
Click Print at the top of the table.
Select the barcode printing option.
The selected items will be added to the Barcode Print screen with a default quantity of one label each.
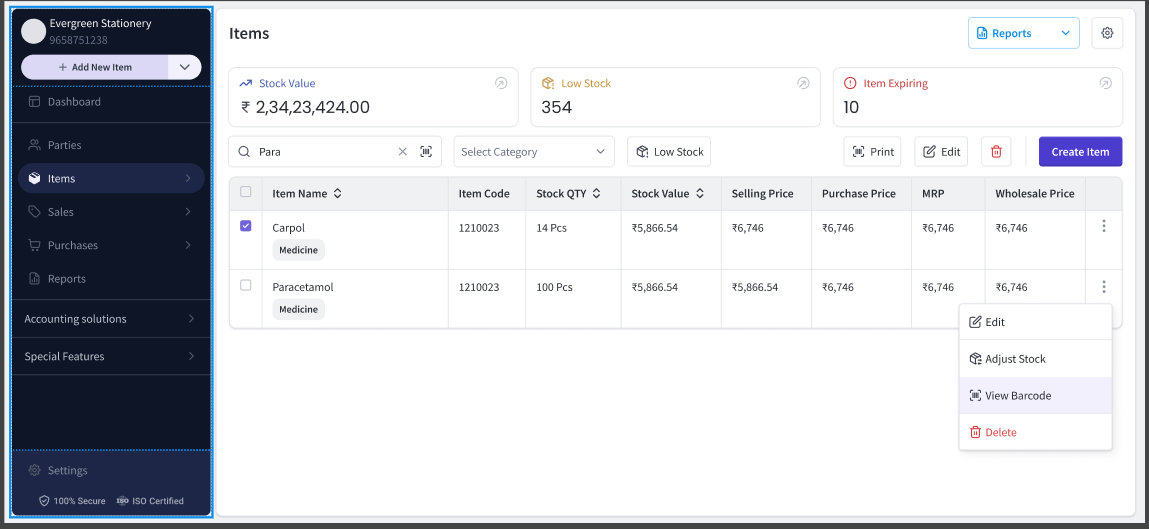
From an Individual Item
Go to Items.
Open the menu next to the required item.
Click View Barcode.
In the barcode window, select one of the following:
Print to open the Barcode Print screen.
Barcode Settings to customise the label.
Add More Items to the Print List
You can add additional items without returning to the Items page.
On the Barcode Print screen, click Add Items.
Search for the item by entering its name.
Select the item from the search results.
The item will be added to the existing print list.
If the item has already been added, myBillBook will show a message informing you that the item is already present in the list.
Remove an Item from the Print List
Move your cursor over the item you want to remove.
Click the Delete icon.
At least one item must remain on the screen.
If you try to remove the final item, myBillBook will ask whether you want to leave the printing screen.
Click Yes, Leave to return to the Items page.
Click No, don’t delete to continue editing the print list.
Open Full Barcode Settings
To customise the label:
Open the Barcode Print screen.
Click Full Settings or Barcode Settings.
When you visit the Barcode Print screen for the first time, a product guide may highlight the Full Settings option.
Click Got it to dismiss the guide.
Click Full Settings to open barcode customisation.
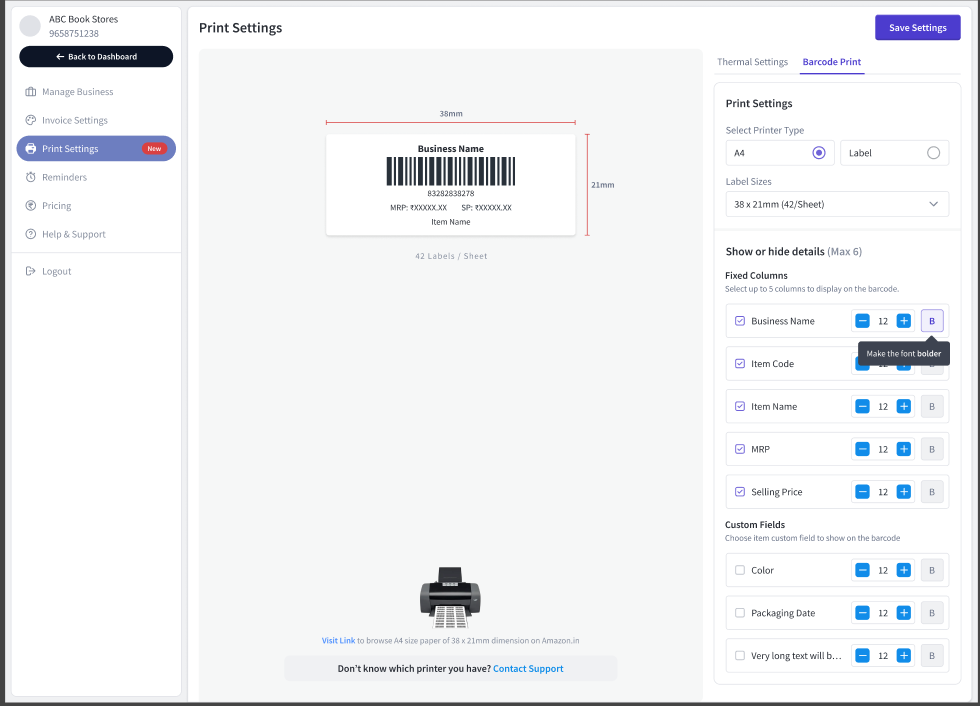
Select the Printer Type and Label Size
In Barcode Settings, first select the printer type.
A4 or Regular Printer
Available sizes include:
64 × 38 mm
42 × 23 mm
52.5 × 25 mm
70 × 37 mm
The default regular printer size is 52.5 × 25 mm.
Label Printer
Available sizes include:
38 × 25 mm
50 × 25 mm
100 × 50 mm
The default label printer size is 50 × 25 mm.
When you change the printer type or label size, the preview updates automatically.
Settings for each printer type are managed separately. Switching to another printer type may show its default or previously saved settings.
Show or Hide Item Details
You can control which standard fields are printed on the label.
Depending on the item, available fields may include:
Business name
Item name
MRP
Selling price
Batch number
Manufacturing date
Expiry date
Turn a field on to display it or turn it off to remove it from the label.
Add Item Custom Fields
You can also show information saved through item custom fields, such as:
Brand
Colour
Material
Category
Rack Number
Internal Code
To add custom fields:
Open Barcode Settings.
Go to the custom-fields section.
Select the required fields.
Review them in the label preview.
You can select up to six custom fields.
If you select more than six, myBillBook will display:
You can select up to 6 custom fields only.
If a selected custom field is empty for a particular item, that field will not be printed on that item’s label.
Change the Font Size
You can customise the font size for individual standard and custom fields.
Select the field you want to edit.
Use the increase or decrease controls.
Check the result in the live preview.
The supported font size is between 8 and 36.
If the content becomes too large for the selected label, myBillBook will continue showing it in the preview so that you can decide whether to adjust the font or print it as displayed.
Save Barcode Settings
After completing the customisation:
Review the barcode preview.
Click Save Changes.
The updated settings are saved to your account and will be used the next time you print barcodes.
Changes made in one browser tab are not applied until you click Save Changes. If the same settings page is open in multiple tabs, the last saved configuration will be used.
Download Barcode Labels as a PDF
Confirm that all items have valid item codes.
Confirm the quantity for each item.
Review the selected label size and design.
Click Download.
myBillBook will generate a PDF containing the required number of labels.
For multiple items, labels will appear in the same order as the items shown on the Barcode Print screen.
Print Barcode Labels
Confirm your items, quantities, and settings.
Click Print.
The browser print dialogue will open.
Select your printer and printing preferences.
Click Print in the browser window.
myBillBook now uses a PDF-based printing process. You do not need to install third-party printing software.
If you cancel the browser print window, your selected items, quantities, and settings will remain unchanged. You can make adjustments and print again.
Barcode Printing on Android and iOS
On the mobile application, open an item and tap View Barcode to access barcode actions.
The actions are displayed in this order:
Delete → Share → Download → Print
Barcode custom fields and label-size customisations configured on the web are currently not displayed on mobile. The mobile barcode view will continue to use the existing design.